
Nation Sites
The Nation Network
CanucksArmy has no direct affiliation to the Vancouver Canucks, Canucks Sports & Entertainment, NHL, or NHLPA
Inside Manny Malhotra’s systems: How the Abbotsford Canucks’ tactics may adapt to Vancouver
Photo credit: © Tav Morisson-CanucksArmy

By Elijah Ford
Jun 8, 2026, 17:15 EDT
When Ryan Johnson was named the 13th general manager of the Vancouver Canucks, it seemed almost inevitable he would bring in his Calder Cup-winning head coach, Manny Malhotra, as the new bench boss.
As a former player himself, Malhotra has earned a reputation as a player’s coach. Most notably, many have praised him for his commitment to developing young players and his strong track record of getting the most out of players’ talent. With the Canucks in the middle of a self-described rebuild, player development and patience with younger athletes are key traits for any coach stepping into this situation.
But how does Malhotra build a team’s systems to support that philosophy, and how do they compare with those of previous Canucks head coaches? Let’s break it down, starting in the defensive zone and working our way up the ice.
Before we begin, it’s worth noting Malhotra could adjust his systems as he makes the leap to the NHL, depending on personnel and other factors. The breakdowns below are based on footage from his Abbotsford Canucks teams.
For a reminder of Adam Foote’s systems for the Canucks last season, click here!
Defensive Zone
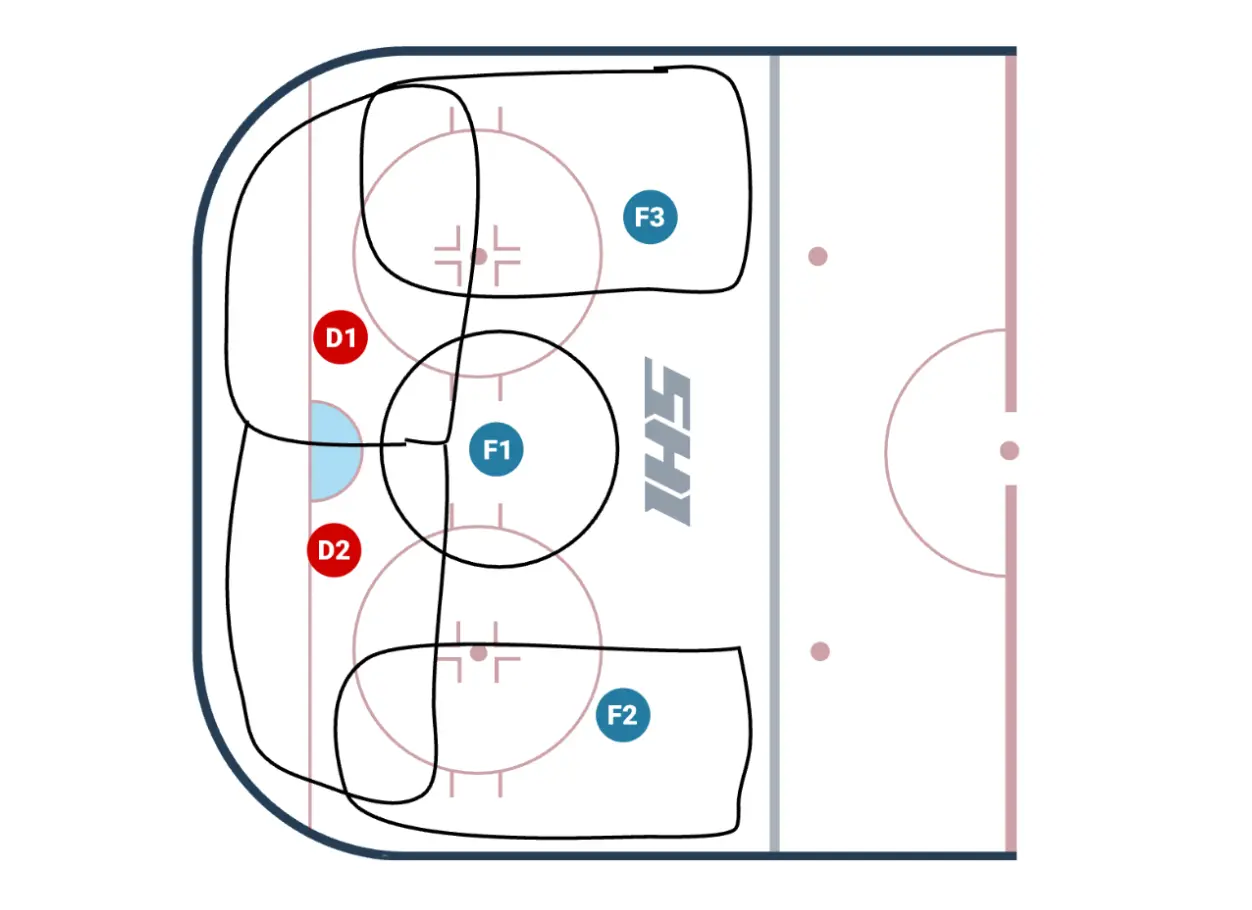
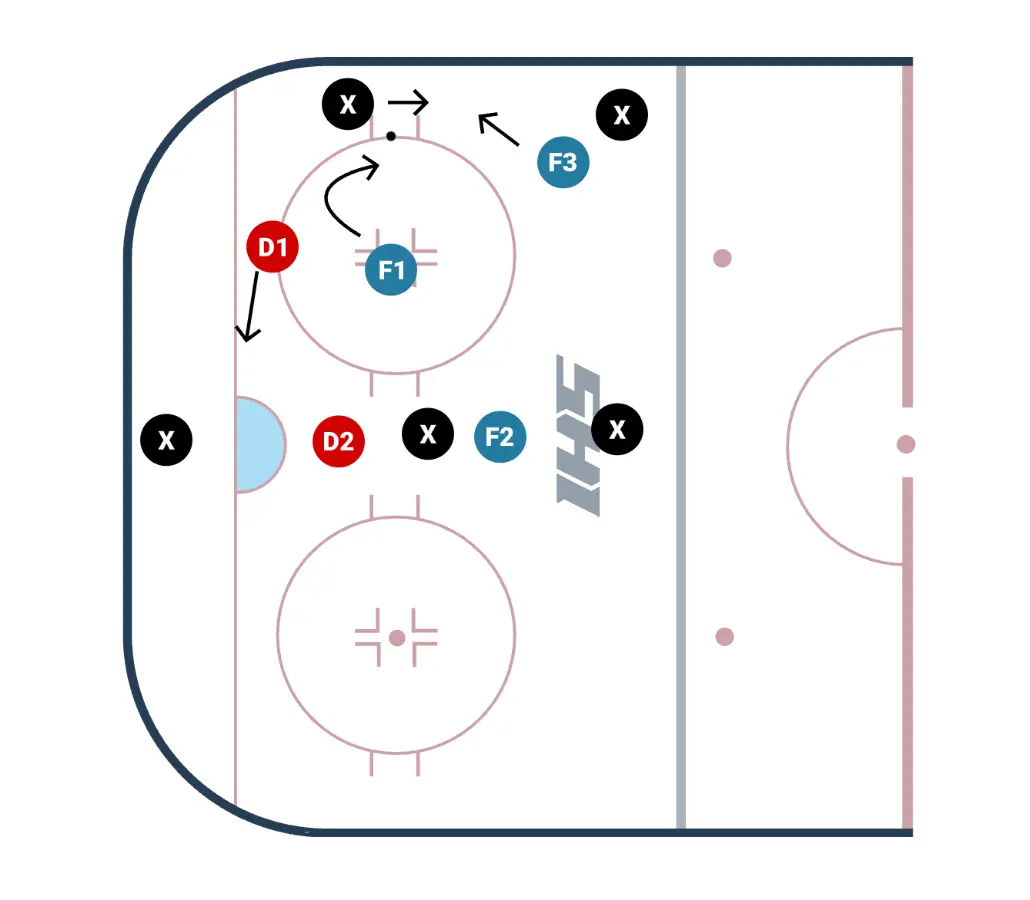
When the puck is in the defensive zone, the primary goal for Abbotsford is to protect the middle of the ice. They play a box-and-one style defence designed to force plays up the wall and isolate players in one-on-one or two-on-one situations.
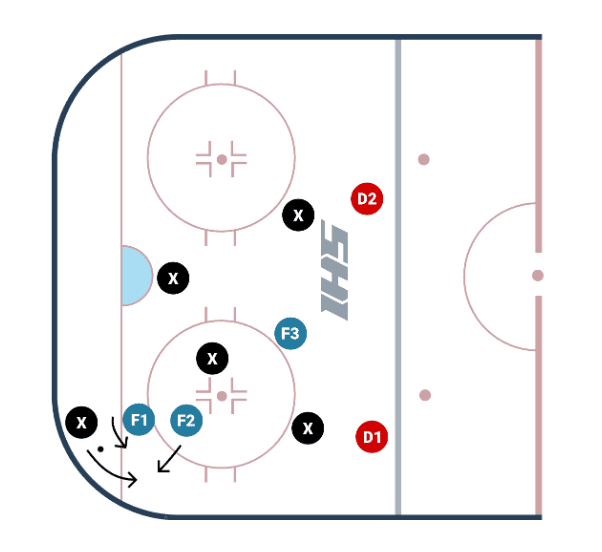
When the puck is dumped into the zone, the defenceman’s first goal is to reverse the puck to the weak side as soon as possible. If he is unsuccessful, the centreman is the first one in to support the puck in the corner. The general rule of thumb is for him to support as low as the second opposing forward goes. The weak-side defenceman covers the front of the net, while the weak-side winger drops down to cover the high-slot area. The strong-side winger prevents passes to the strong-side defenceman, hovering around the ringette line.
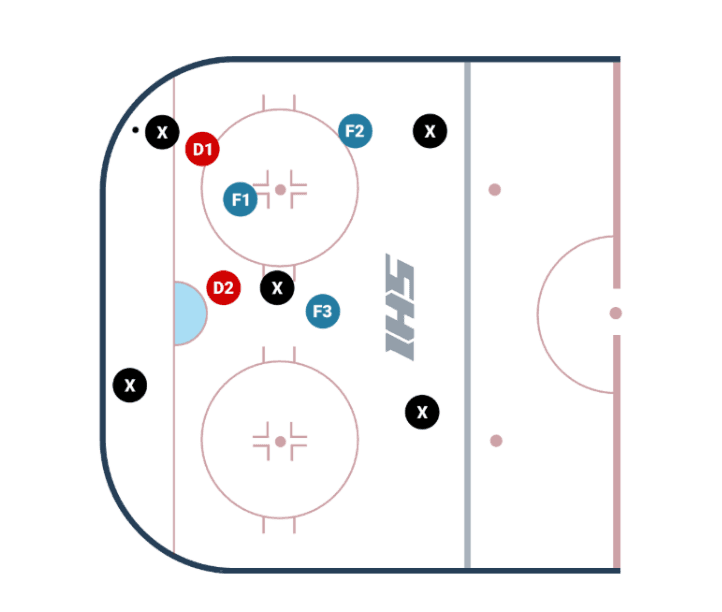
If the first defenceman on the puck is within a stick length of the opponent, or “in his pocket,” he continues to force the opposing forward to the outside all the way up the half wall. If he does this well, the centreman can be aggressive in his support, taking away the middle of the ice while also potentially creating loose pucks.
If the first player with the puck is able to create space for himself along the half wall, the defenceman comes back to the net, and the centreman takes over that assignment. If this happens, the same principle applies, only this time it’s the centreman and winger creating the two-on-one pressure. The goal in both situations is to create a “swarming” effect while maintaining plenty of support in the middle of the ice.
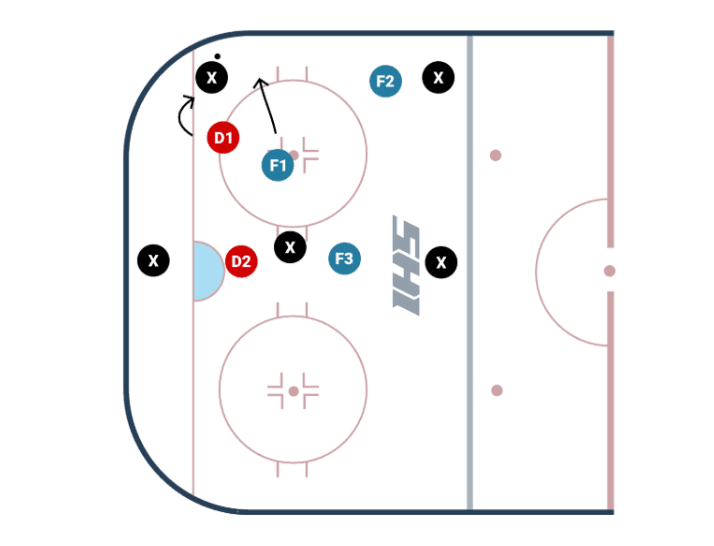
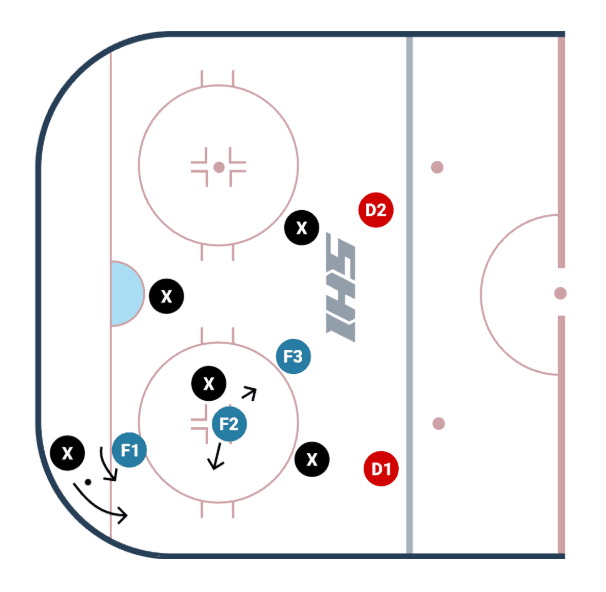
If the puck gets to the strong-side defenceman, Abbotsford’s defencemen and centreman look for players to tie up around the net, while the two wingers work to prevent point shots from getting through for goals, rebounds, or tip-ins. If the puck is passed D-to-D, the weak-side winger is already in that shooting lane.
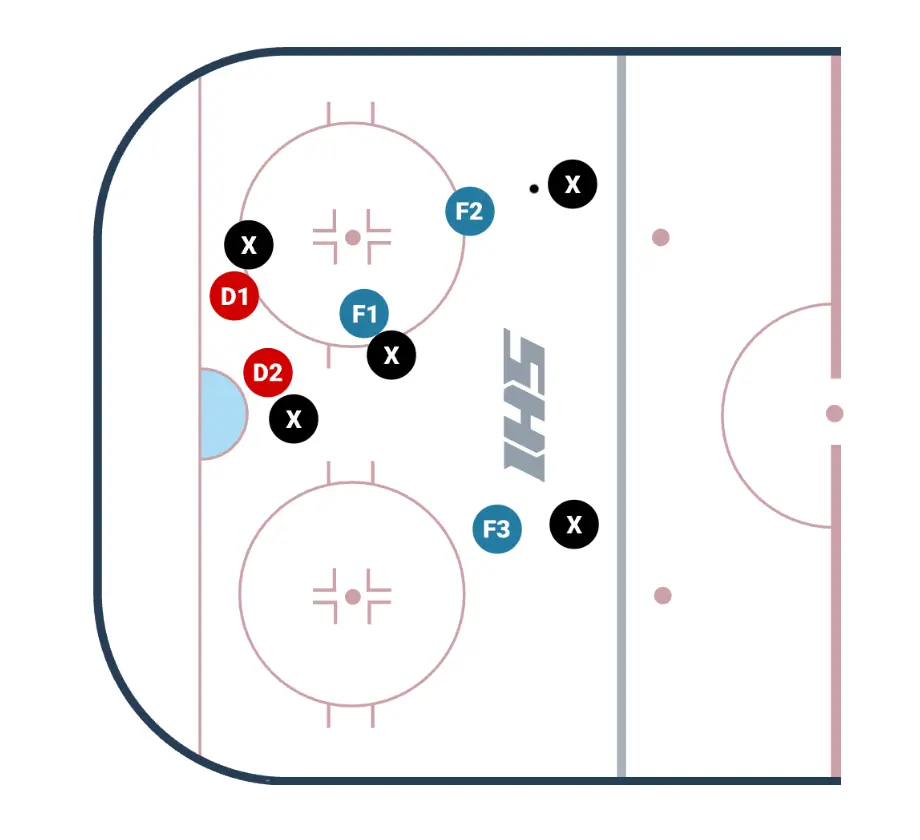
If a play is made and the puck is moved quickly to the weak side, the weak-side defenceman steps up and challenges that skater. The centreman has to make the difficult defensive play of skating quickly from the strong-side high-slot area to the weak-side half wall.
Breakouts
When a defenceman goes to retrieve the puck in the corner, his first job is to get the puck to the weak-side defenceman. This creates additional space from the incoming forechecker.
The main way Abbotsford moves the puck out of its zone is through quick “bump” passes to the middle of the ice. This may sound like a dangerous premise, but at the highest level of hockey, it is expected that both the passer and the player in the middle have the hockey IQ to create space and move the puck to open ice. The middle of the ice is a good place to have the puck in the defensive zone because of the control it creates and the options it opens.
When the puck is moved to the middle of the ice, a passing triangle is formed and there are four legitimate passing options available. He can move the puck up to one of the streaking wingers, move it to the centreman cutting up ice, or skate it up himself.
When Abbotsford’s goaltender handles the puck, the two defencemen move into the corners. The player who receives the pass immediately reverses the puck to the weak-side defenceman, starting the breakout process again.
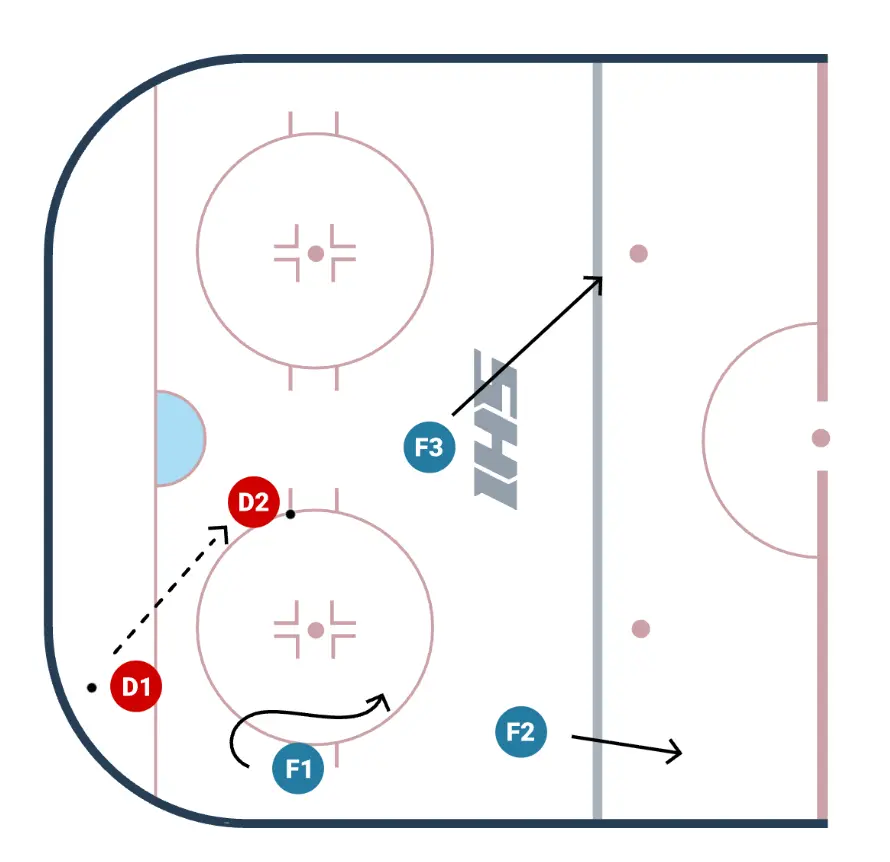
When breaking out from behind their own net, one of Abbotsford’s most common plays is to send a centreman up the strong-side wall with speed, with the strong-side winger trailing behind.
Once the centreman reaches the neutral zone, he cuts quickly to the middle of the ice. This either creates room for him to receive the puck with speed through the middle or forces the opposing strong-side forward to follow him inside, leaving the strong-side winger open along the wall.
The weak-side winger positions himself at the far blue line, ready to chip in any pucks coming his way, while the weak-side defenceman gives his partner a simple cross-ice option.

Neutral-Zone Forecheck
Abbotsford plays a 1-1-3 neutral-zone forecheck, which is an uncommon approach. The bench-side winger drops back and plays a defenceman’s role in this part of the system.
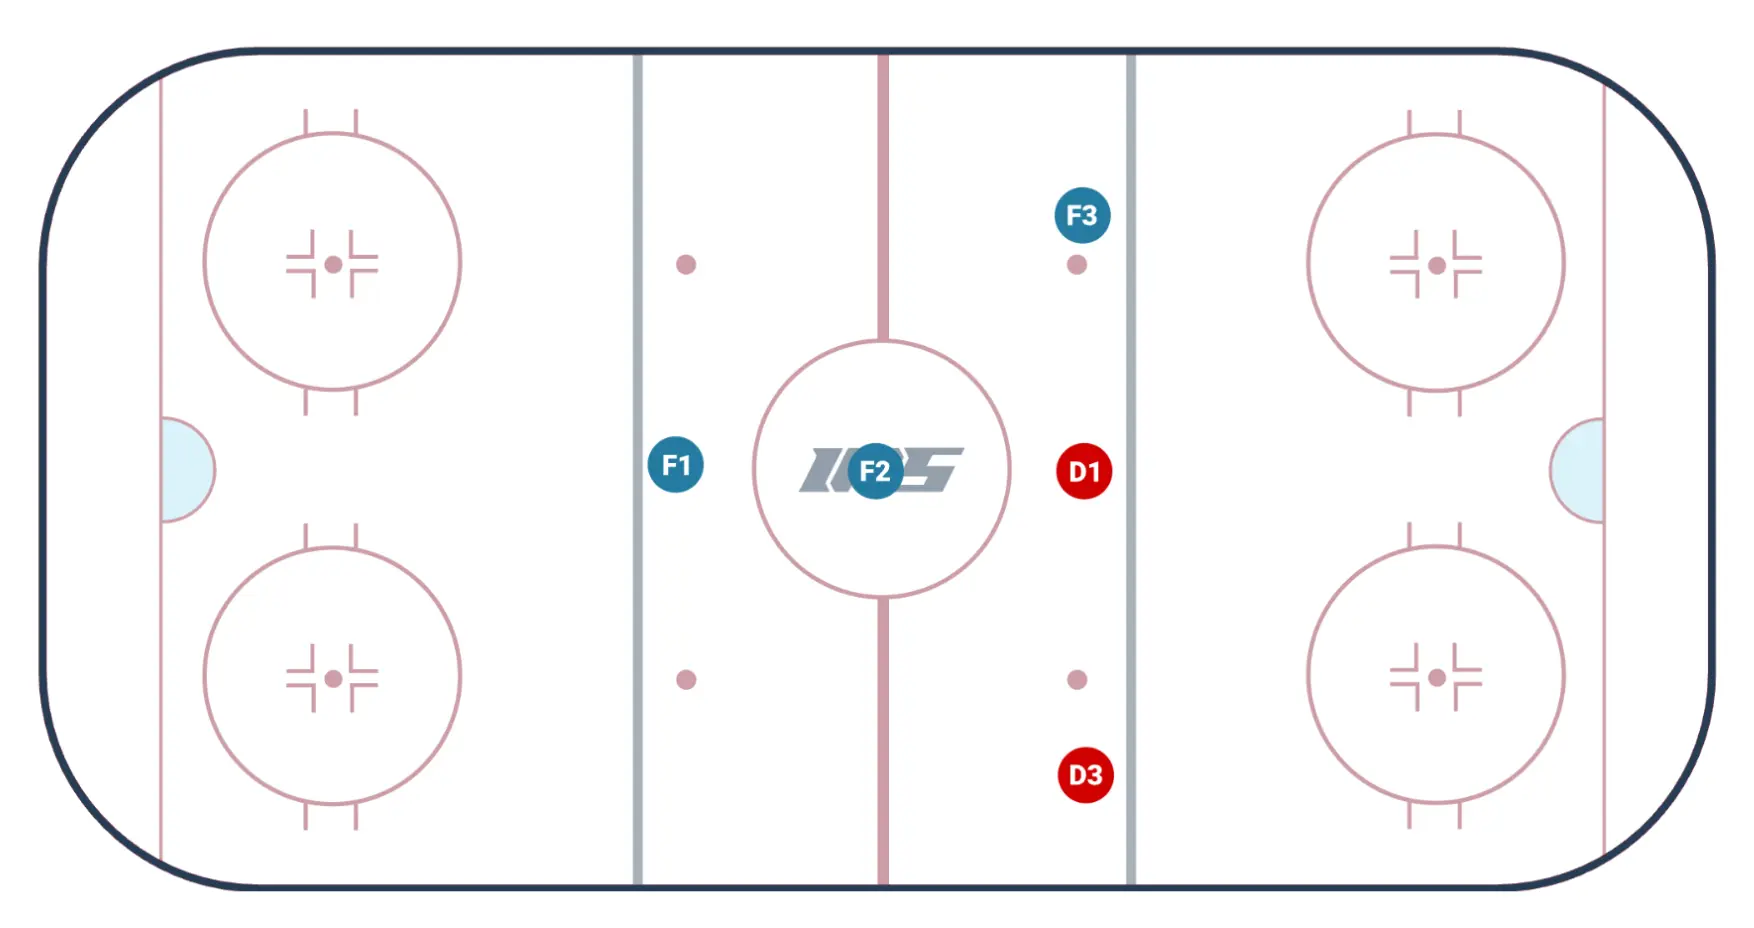
The first man on the puck’s responsibility is to force the play up the boards. The second man’s job is to play a proverbial wall so the puck carrier can’t cut back or cut into the middle. When the puck comes up the boards, the strong-side defenceman steps up and forces a dump-in.

If the puck is retrieved in the strong-side corner, Abbotsford moves the puck back up the strong side as soon as possible. They do this by having the weak-side defenceman slip to the middle while a forward drops to the half wall, just like their normal own-zone breakout. If the puck is rimmed to the weak side, the same breakout occurs, only in reverse.
Forecheck
Abbotsford runs a basic 1-2-2 offensive-zone forecheck. The goal of the first forward in this system is to attack the puck and force the carrier into the boards. The third forward on the play stays in the high-slot area, not overcommitting to the boards so he can defend if the opposing team reverses the ice.
The second attacker has the most cerebral responsibility in this attack. How aggressively this forward checks depends on factors such as the score and the time remaining. In an offence-leaning situation, the player comes down low to suffocate the carrier before he has time to move the puck. This option, however, can create offence the other way if the puck carrier is able to slip the puck to a supporting forward. If the team is playing more conservatively, the second forward hovers around the middle of the faceoff circle, supporting the play while still being in position to get back in transition.
Aggressive
Conservative
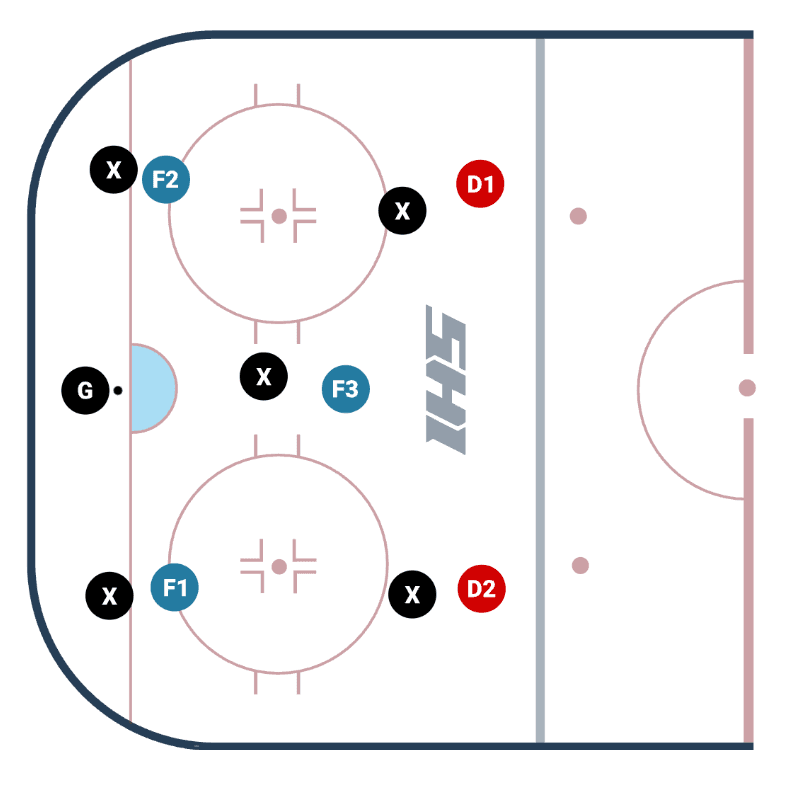
If the goaltender touches the puck behind the net, Abbotsford shifts into a 2-1-2 forecheck. In this formation, the first two forwards attack a defender each, with the third forward hovering in the middle of the zone. This prevents the goalie from making an easy breakout pass, instead forcing him, in most cases, to shoot the puck around the glass, which can create loose pucks.
Conclusion
The system Malhotra ran in Abbotsford was influenced by his time with Sheldon Keefe in Toronto. The main principles behind it are puck possession, taking away primary scoring areas, and applying consistent pressure on the puck through double teams and forecheckers. On the bench, Malhotra constantly conveys energy and intensity to his teams. His style is most comparable to coaches such as Rod Brind’Amour, Martin St. Louis, and Spencer Carbery. Canucks fans hope he can bring Vancouver similar success to what those coaches have enjoyed.
PRESENTED BY VIVID SEATS

Breaking News
- Abbotsford Canucks hire Ryan Papaioannou as new Head Coach
- Where does newly signed Mitchell Weeks fit in the Canucks’ goalie depth chart?
- CA’s top 20 Canucks summer prospect rankings: #19 Wilson Björck
- Analyzing Paul Cotter’s fit in the Canucks’ bottom six
- Alex Edler rejoining Canucks in player development role

Vancouver CanucksTeam Cap Summary

Cap Summary
2026-27
2027-28
Projected Cap Hit
$86,185,833
$62,923,333
Projected Cap Space
$17,814,167
$50,576,666
Current Cap Space
$17,814,167
$50,576,666
Active Players
23/23
13/23
Draft Picks
Round
'26
'27
1
2
1
2
2
2
3
1
1